This Is How: ‘Lucky Tears’ by James Correia
So great to have James Correia on the site today, telling us all about how he captured this emotional image which so deservedly won him a Reportage Award back in Collection Six. This is an exhaustive and incredibly insightful piece, with James dishing out some unbelievably great nuggets of advice – definitely a must-read!
As a photojournalist the one thing I crave for most at weddings are tears. Is that crazy? Am I cruel? Well, of course not. You see, these are tears of joy, and at every wedding I am on a hunt for tears of joy like a predator stalking it’s prey.
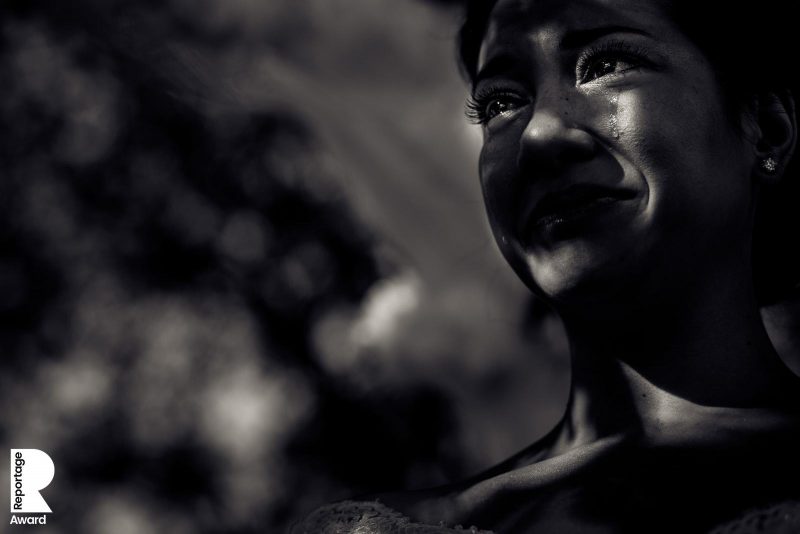
This wedding was held in the backyard of the bride’s family home in Canada. It was a small property, but just enough space to hold about 40 of their closest friends and family. Once the ceremony began, well before walking down the aisle, the bride began to cry. She cried while walking down the aisle, cried when she saw her groom, cried during the vows, well .. you get the idea. It was a festival of tears. And it was contagious. Everyone was crying. No one could hold it in. There wasn’t a dry eye to be seen for the entire 20 minute ceremony.
As everyone was bawling their eyes out, I had a revelation. This is it! This is my time to capture the ever so elusive tear shot. The holy grail was in my reach. Let’s get ready.
Step 1: Positioning
Often I’m asked by my non-photographer friends, “what’s the secret to taking a good photo”. There is no secret and I have no real answer, but what I have learned over the years is to “get into a perspective that isn’t ordinary”. By that I mean, don’t stand straight with your camera at shoulder height a few meters from the subject. I once heard Ryan Brenizer refer to this as “the zone of mediocrity”. 99% of the photos an average person takes is at this viewpoint. It’s common, familiar, and boring. Change it up.
Get close, get far, get high, get low.
When it comes to emotions I prefer to get close. When you view a photo from a tight and close perspective you feel the emotions more. You feel like you are a part of the emotion and that feeling transfers from the photo to you. So I grabbed my 85mm. In all honesty, I would have preferred to have my 135mm on hand, but it wasn’t available. I got as close as I could without being too obtrusive.
I also got low. Why? Because “eye level” would feel too familiar, but also because having her gaze upwards accentuated that these were tears of joy as she looked up to her groom, just like we look up to people we admire, our role models.
Step 2: Composition
This is entirely subjective, but I didn’t want her centered because there is no symmetry involved considering my angle and position. Also the empty space on the left leads our eyes to the subject on the right.
Step 3: Exposure
This was the trickiest part because the ceremony was in a backyard not ideally designed for a ceremony. Most venues would either have a spot wide open with no shade or completely shaded. This backyard was lined with trees creating unpredictable hotspots as the light shone through the leaves. This is where understanding what you can do in post-processing influences how you shoot. Here I exposed for the highlights, knowing that if needed, I can pull details out of the shadows, whereas if I exposed for the skin there will likely be blown out hot spots that could not be rescued in post. Shoot in a way that gives you the most flexibility for success.
Step 4: Wait
Early in my career it was easy to lose patience; to quickly move on to another composition to get variety. It wasn’t after some experience that I learned to anticipate when a moment is most likely going to happen and to know when is the right time to wait. And to keep waiting. Once I have my position, composition and exposure all set, I wait for the “moment” to come to me.
I’ve shot this moment at weddings often enough. I know that someone is making a speech and it often starts with jokes but ends with a heartfelt message. Right now they are making jokes, so just wait. Wait for them to talk about how much the couple means to them. It’s coming. I know it. I’ve heard hundreds of speeches and that’s the routine, 9 times out of 10. I know how this movie ends. So just wait.
Step 5: Shoot through the Moment
Every moment has a climax. You don’t know when it will happen but once that moment comes, keep shooting. Boom! I got a tear shot! Don’t stop shooting. Is it the best tear shot? I don’t know. Another tear is coming, maybe it will be a …. bigger tear? We don’t know what will be the best shot, so we keep shooting until the moment is over.
Step 6: Luck
Yes luck is random. But it can also be mitigated. Two Mann Studios has taught me to put myself in a position to get lucky. Find your luck, don’t wait for it to come to you. Put yourself in the position to have the highest possibility of luck. Game the system. Buy all the lottery tickets. Find the gold in the landfill of garbage.
Knowing when the moment will mostly likely occur. Getting into the best position. Have your setting and composition set. Shooting through the moment. All these steps will help you get lucky.
I got lucky.
With all the movement of leaves creating light and shadows across the face, in only a few of the hundreds of frames I took did I get one where the light shone right on the tear. Where an opening of the foliage created a catch-light in the eyes.
Yes I got lucky. But I bought a shit load of lottery tickets.
Thanks so much to James for this fantastic piece! You can see more of James’ work on his website, or here on his This is Reportage profile.
We also have over a hundred more of these brilliant ‘This is How…’ pieces by our TiR members.
Would you like to join us and enter our Awards? The deadline for submissions to Collection Nine is just under a month away: Submit by 23:59 BST on 24th May 2019. Not yet a member? Apply for membership over here. Members receive 60 Reportage Award and 18 Story Award entries per year, along with a wealth of extra benefits.
No poses; nothing staged: This is Reportage.
